Saturday 28 February 2015

Temple Run VR

Samsung unveiled several highly anticipated devices: smart Galaxy Note 4 and Galaxy Note Edge, as well as virtual reality helmet Gear VR. The latter is not an independent unit, and kind of headset for Galaxy Note 4, whereby the owner of two gadgets may temporarily move into the voluminous game world and become a direct participant in the events taking place there. Meanwhile, it became known today, which game future holders Gear VR and Note 4 will be able to start the first mode, a virtual reality. It would be an endless runner Temple Run by Imangi Studios.
If you still were not familiar with the game Temple Run, hasten to clarify that the game is an arcade game in which the protagonist is running, overcoming various obstacles and collecting coins, with the aim of the player is to survive as long as possible. The game is infinite, and therefore can not win it, but each time the player is competing with himself, trying to put all the new records. Controlling the main character will be using head movements. It is unknown exactly how the release of the game will be implemented: updated if an existing version of Temple Run or Imangi Studios will release a brand new version of the game. It is known that currently play for free, but pricing remains unknown future edition: Either Temple Run will be free, or will be distributed for a certain amount of money, or will include in-game purchase. By the way, the presumed value of Samsung Gear VR is $ 199 in the USA and 199 € in Europe.

How to boot Android phone into Safe Mode

Ever you wonder your Android smartphone can also boot into the safe mode like your computer yes, You can boot your Android smartphone into the safe mode to increase the performance of your Droid. Now the main question arose why you have to enter the safe mode, let me explain you install a third party app after that you experience some lag or performance issue, but you don’t know why this happening now here safe mode will help you enter the safe mode to check whether it is application issue or hardware.
Let’s Start how to boot into the Safe Mode
When the phone is in safe mode, you’ll see the word Safe Mode in the lower left corner of the screen.
android-safe-mode
1. Hold the Power Button for 2 seconds for the power menu.
2. Press and Hold the “Power Off”
3. A pop-up window will appear asking if you are willing to boot into Safe Mode, Click Ok.
4. Your device will be rebooted into Safe mode.
Now you are in the safe mode now check the device performance again if there is no lag/issue for the performance, this means the problem is with the newly install application or update.
Method 2
1. Hold the Power Button for 2 seconds for the power menu.
2. Press and Hold the “Power Off” Let your phone turn off completely.
3. Turn on your phone, Press and hold the Power button again to turn on your Mobile.
4. Immediately press and hold both the Volume Up and Volume Down buttons on your device. Keep holding, while the device boots. Once your Android device has booted, you will see the words “Safe mode” displayed at the bottom-left corner of your screen.
To exit the safe mode, restart your device by holding the power button, then power off and restart. The device will open in the normal mode automatically. All your application’s data are saved, yet the one major drawback with Safe mode is that will log you out of all the non-Google apps. So if you have android apps like Dropbox, Twitter or Facebook on your phone, you’ll have to log in again in all these apps.

How to Avoid Installing Unwanted Toolbars while Downloading

We download thousands of things but what we do not know is that knowingly or unknowingly you also download junk and mysterious toolbars! It is for sure you must have experienced this horrible situation some time or the other in your life.
How To Avoid Installing Unwanted Toolbars While Downloading
As the dependency on technical devices is ever increasing, internet spammers are finding their delight into our virtual and real lives. Once these are installed, hackers can access your data easily. For example many toolbars are bundled with malware downloading such a program may be dangerous. Many times, it is seen anti-virus software is also unable to check the threat.
Nonetheless with the help of Unchecky which happens to be useful software, this problem can be sorted out for now. You can be relieved as it can detect malware and fix them in a jiffy. It is basically free software which is designed in such a way that can keep a check on third-party unwanted software which generally bundles with the desired applications you wish to download.

Why use it?

Unchecky should be used because:
  1. The program – It tracks the hard–to-find tools and before you start downloading, it will notify you with a warning message about the application. It also monitors set-up programs and ensures not to allow any kind of junk software run into your hardware.
  2. Ease of use – Using Unchecky is very easy. You have to simply download it and there is no need to run it. It will automatically set in the background quite easily and will be ready to confront issues. It also updates itself automatically. So there is no need to download it from time to time. Don’t worry this software will not slow down the system at all.
  3. How does it work – Once you have it installed in your system, it will automatically check the presence of junks. Sometimes when you install any toolbar, it comes up with a warning message and sometimes it may not. No you don’t have to worry as Unchecky will resolve issues as it finds a single trace of malware.
  4. Limitations – However, there are certain limitations of Unchecky. It will not help for all malware. It can neither scan your toolbar nor can act as anti-spyware engine. So, it is advisable that you read about it thoroughly before installing it.
Apart from all this Unchecky is a great Program as it provides prompt solutions for crappyware. Its prime objective is to fine tune any set up and keep away those extras which are irrelevant. It indeed is one of the smartest designed window services that will protect from hardware harm. There is a lot of scope for it to develop as of now and rest assured it is a great program to be put to use. Yes it is high time that you share the goodness of Unchecky with others for experiencing and downloading junk-free toolbars right away. So, what are you waiting for? Get it installed and share the information.

Friday 27 February 2015

Orderly


Orderly is a Tekton Technologies developed to-do list app which which is exclusive only to apple mobile devices (ipads and iphones). In a world where reminder and task apps actually complicates life, making one to opt going on without the need of one, orderly definitely stands out amongst its competition because if its simplicity and is available at the itunes store for $0.99 fully unlocked with no in-app purchases.
Taking a more insightful look at the app, you are greeted by a thorough tutorial when you open the app for the first time. Daunting as it may look, you can really get by without even using the tutorial as the icons in the app are reletively obvious which in part makes this app stand out. This is what makes the orderly app absolutely fabolous. To get going, tap the”+” icon at the top right corner to bring out the task creation screen. On the screen you can then add the title and list down the task. At the top of the task creation screen you are able to style your task with either colour or font. This is done by tapping the “T” button. Beside the “T” button there is a clock which allows you to set a reminder to your task or reminder. Orderly app also allows you to use gestures to delete or mark a task as completed. Swiping right to left will delete your task and swiping left to right will mark your task as complete. Very simple indeed.
A great feature of this app is that it is not cluttered with functions, on the contrary, the developers took a minimalistic approach by putting in the most basic of features. The app separates to do lists into three categories which are high, medium and low priorities. You can create list inside a list and then prioritize the urgency of your chore by either dragging it to the top of the list or by or set a due date which allows the app itself to prioritize your list. Orderly has a home and work view which allows you to separate your tasks and reminders, making ones life more streamlined and simpler to follow. Another feature of the the app is that reminders and tasks can be triggered geographically. This feature comes in quite handy for those little tasks which are quite easy to forget like buying salt. Orderly also syncs with cloud device allowing you the convenience of interchanging your apple mobile devices. The different themes which are featured on the app is visually pleasing ,allows you to match it with your iphone or ipad device and also allows you to arrange your task priority by colour.

Overall, with a jungle full of apps which insist on helping you create and sort out you tasks and reminders, orderly’s simple to use interface, visual themes, home/work feature and lovely design definitely puts it above its competition and its an app i would strongly recommend for anyone looking hungrily to make their lives much more simpler and convenient.

Project Spartan

Project Spartan is the new Web Browser that you will be seeing from here on in all Win 10 Devices from smartphones to tables, PCs and more! Earlier in Jan 2015, Microsoft announced its new browser whose basic idea is to create a new experience that works well for the modern web, and for that the IE team has built a new rendering engine called EdgeHTML.dll, in order to make the Web “just work”. One can add comments to any webpage with a new notes feature, a clipping tool makes it easy to save content to OneNote. There is a reading mode with an integrating reading list that will save content for offline viewing too. Also, Cortana is built in to Spartan too; which can search for information and pull in relevant about the page you are on.
Microsoft Spartan Modernized IE for Windows 10
This doesn’t mean that Internet Explorer is going away, instead, IE will benefit from the new rendering engine as well, but the only other changes that will come to it moving forward are related to security and high priority bug-fixes claimed IE team. Internet Explorer has been the Microsoft Web browser for 20 years and has evolved to work with ever-changing Web sites over that time. The IE team realized that in order to make it easier for web developers to build compatible websites no matter what browser they focused on, they had to make a break from the past, and build a new engine that is free from 20 years of IE legacy code. Both enterprise users and consumers will have access to Internet Explorer, but the main focus will be on making Spartan compatible with the world’s top 9000 websites, which account for over 88% of the Web traffic. The IE team will ship the new browser only if its compatibility pass rate will be better than that of Internet Explorer and other major browsers.
However, with big change in approach, small websites will not be left out. Microsoft engineers involved with Project Spartan are taking a new approach to solve the compatibility problem, and they have identified a number of key issues like Compatibility View Lists, X-UA-Compatibility, Standards focus, etc.
If Internet Explorer is the browser you love to hate, expect Project Spartan to be the browser you truly love, no matter what type of input you are using.IE team claims that the new rendering engine will help make the browsing experience for customers better, and make building Web sites that just work across browsers easier for Web developers. Although it is expected that win users are soon going to be able to have it in their devices, only after checking it out, we will be able to make any conclusions about this new user friendly browser!

Thursday 26 February 2015

Set any video as your live wallpaper in Android

Live wallpapers are one of the great things that exist on Android devices. They really make your Android phone’s screen look awesome, and you feel like your screen has come alive. Your phone comes preloaded with a number of live wallpapers to choose from, and you can set whatever you think is good for your phone.
While that is a great option and many try out the preloaded live wallpapers, some users just prefer having customized wallpapers. And by customized live wallpapers, we mean the videos that you have on your phone. Thanks to an app in the Google Play store, you can now set any video as a live wallpaper on your Android device. The app turns almost any video into a live wallpaper on your phone. Here’s how you can use the app.
The first step towards turning your video into a live wallpaper is to get the required app installed on your device. Launch the Google Play store app on your device and download the Video Live Wallpaper Pro Free app. It’s a free app.
When the app is installed, launch it from your app drawer.
On the first screen of the app, you should see a couple of options that you can use for your live wallpapers. In order to select a video to be set as a live wallpaper, tap on the first option that says “Gallery.” It will then let you choose your file manager that you will be using find your video. Tap on any that you wish to use.
videoaswallpaper-gallery
Navigate to the folder where your video is saved and tap on it to select it.
videoaswallpaper-select
Here is when the real magic happens. Tap on the option that says “Set Live Wallpaper,” and it will let you see the preview of your live wallpaper.
videoaswallpaper-set
On this screen, you can see the video as a live wallpaper. If you think it’s good and you wish to go ahead, simply tap “Set wallpaper,” and it will be set as your current live wallpaper. It will appear on all of your home-screens just like any other wallpaper.
videoaswallpaper-finalize
There are two other options in the app that let you tweak your wallpaper. Those are:

Play Audio

This option comes checked off by default. That means your live wallpaper will include the audio as well. Unchecking the option will disable the audio, and you shouldn’t hear any sounds on your home-screens. I prefer muting the audio as I don’t want to hear a sound when I unlock my screen.

Loop Video

This option also comes enabled by default. What it does is repeat the video once it finishes playing. In simple words, it keeps your live wallpaper moving forever.

Tuesday 24 February 2015

Mx Player :Review

Mx Player is one of the best and oldest music, video player I have ever used.
I have been using it since I had galaxy S in my hand. This is a very high rated player and can play your videos in background too, just listen the music. It has got material design in the latest update and can be used from gingerbread to lollipop 5.0.2. This is a really great media player. It supports network stream too which means you can add a video url to it and view the video. It also supports subtitles in various file formats. It can decode your video in S/W and H/W decoder. Its a great and elegant app with material design.
Note: For ARM type processor users you have to download a plugin so as to make it work.
Also the new logo is beautiful.

MX Player - screenshotMX Player - screenshot

Http 2.0

The Internet Engineering Task Force's HTTP Working Group has finalized its work on Hypertext Transfer Protocol 2, the successor to the HTTP/1.0 and HTTP/1.1 protocols that are the core of the Web.
The working group has actually finalized two closely related specifications. The first is HTTP/2 itself. The second is called HPACK, a specification for compressing HTTP/2 headers.
Work on HTTP/2 began in 2012 in response to the development of Google's SPDY protocol. Google created SPDY to address a number of performance gripes that the company had with traditional HTTP.
Perhaps the biggest issue with HTTP/1.x was its use of multiple connections to load resources in parallel. While a single HTTP/1.x connection between a client and a server can be used to request multiple different objects (the images, CSS, and JavaScript that an HTML page may require), those objects have to be served up in order, one after the other. If one object takes a long time, perhaps because it's very large or perhaps because it requires a lot of server time to create, then all the other objects requested subsequently have to wait.
As a result, most HTTP/1.x connections are used to request just a single object. Web clients do perform parallel loading of the objects that they need, but they do so by creating multiple connections to each server. But this has a cost of its own: it uses up additional network resources, and it takes extra time, with each individual connection requiring several transfers from client to server and back again.
HTTP/2 directly addresses this issue. In HTTP/2, multiple bidirectional streams are multiplexed over a single TCP connection. Each stream can carry a request/response pair, and multiple requests to a server can be made by using multiple streams. However, the streams are all independent; if one stream is slow, the HTTP/2 connection can still be used to transfer data belonging to other streams. Similarly, a client can request a large object and then a small object, and the response to the small object can be given before, or even during, the response to the large object. The waiting and sequential processing that are a feature of HTTP/1.x aren't needed in HTTP/2. The specification recommends that clients and servers support at least 100 different streams over a single connection.
HTTP/2 also brings some other changes to improve performance and capabilities. Traditional HTTP/1.x is a text protocol, with requests and responses all using plain human-readable text. HTTP/2 is a binary protocol that splits requests and responses into sequences of non-human-readable frames that are transmitted over the TCP connection. HTTP/2 also allows servers to push streams to clients without those clients having to make the initial request.
While a binary protocol, HTTP/2 doesn't change the underlying semantics of an HTTP connection. Requests and responses are still divided between headers and (optionally) bodies, with the headers used to provide important metadata about the bodies. Rather, the protocol is a new way of expressing those same messages designed to make HTTP communication more efficient.
HTTP/2 is based in large part on Google's SPDY. SPDY did some things that HTTP/2 does not. It required the use of TLS (Transport Layer Security) to enhance privacy and security. HTTP/2 makes this optional; it can operate over TLS or over plain TCP. Some vendors, however, have said that their implementations will only support HTTP/2 over encrypted TLS connections to regain these privacy benefits.
SPDY also—initially—used gzip compression for the headers sent in both directions. In 2012, however, this use of gzip was discovered to be dangerous, exposing users to an attack that has become known as CRIME. SPDY was altered to stop using gzip in this way. HTTP/2's solution is that second specification: HPACK.
HPACK is a way of compressing the HTTP headers sent over HTTP/2 connections that avoids the CRIME flaw. Unlike gzip, which is a general purpose compression algorithm, HPACK is designed specifically for HTTP/2's needs.
With IETF signing off on HTTP/2, the next steps are for some editing to be done and for both HTTP/2 and HPACK to be officially published as RFCs.
Browsers are well on their way toward supporting the new specification. Chrome 40 will include HTTP/2 support, with Google announcing earlier this month that SPDY support would be removed from Chrome in early 2016. Mozilla has said that Firefox 36, due to be released next week, will negotiate HTTP/2 connections using drafts 14 and 15 of the specification. Firefox 37 and 38 will add draft 16. The finalized version, draft 17, should follow soon after. The Windows 10 Technical Preview also includes support for draft 14, and the Project Spartan browser that's replacing Internet Explorer will include HTTP/2 support.

15-year-old Star Wars Fan Receives Darth Vader-esque 3D Printed Prosthetic Hand

 
Joe and his new hand. (source: newsteam - dailymail.co.uk)
Joe and his new hand. (source: newsteam – dailymail.co.uk)
Over the past year or so, we have covered dozens of stories of 3D printed prosthetic hands, most of which have been created by a group of volunteers from e-NABLE. e-NABLE is an organization of individuals who share designs, ideas, and tips for 3D printing prostheses for children in need. Recently there have been a plethora of unique designs originating from this organization, providing children with prosthetic hands themed after their favorite movie characters, comic book personalities and more.
For 15-year-old Joe Oxenbury, he was born without fingers on his left hand. His loving father Chris admits to breaking down in tears when he first saw Joe in the hospital after being born.
“I realized he had no fingers on his left hand,” writes Chris Oxenbury. “I was devastated. I burst into tears. This goes against my rule: you’re only allowed to cry if someone dies, stubbing toes, severe physical pains and onions are allowed.”
(source: newsteam - dailymail.co.uk)
(source: newsteam – dailymail.co.uk)
It turns out that Joe never was made fun of in school. In fact, he has plenty of friends who treat him as they do with their other friends. When it comes to video games, Joe has no problem playing them either. Chris says that he’s actually quite the “wiz” when it comes to playing games on the XBox, iPad, PC and Nintendo DS.
Years ago, Chris took part in a fund raiser in order to have a prosthetic hand made for his son. It was a 24-hour charity event, which culminated in raising over $3,000 needed in order to have the prosthetic hand created for Joe. In the end though, while the prosthesis looked great, its functionality was pretty much nonexistent. Chris wanted Joe to be able to have a prosthesis that would actually give his left arm more function. So when he came across a Youtube video of another child who was using a 3D printed prosthetic hand, he immediately knew that this was something he wanted to get for his son.
Chris found the website of e-NABLE, contacted them, and was subsequently put in contact with a volunteer from his area in the United Kingdom, named James Holmes-Siedle. James and Chris sent several emails back and forth to each other, before they decided exactly what Joe would need. James sent Chris a measuring device to determine the size of Joe’s arm. Once the sizing was complete, Joe had to decide which design he wanted. He ended up picking a Steampunk design that was Darth Vader-esque in looks and James proceeded to 3D print it.
(source: newsteam - dailymail.co.uk)
(source: newsteam – dailymail.co.uk)
“It is a bit like the one Darth Vader had in Star Wars,” explained Joe. “I chose it deliberately as I was going for that kind of style and colour. I was very happy when it arrived. It was better than I thought it would be.”
The Darth Vader looking prosthetic hand only cost about £30 to make using free open source designs and a desktop 3D printer. While it took about 20 hours to print out, within ten minutes of putting the hand on, Joe was picking items up with ease.
“This new hand feels like part of him. When he rotates his wrist, his fingers clench,” explained Chris. “When Joe gets older and grows, we can just print out a new one or new parts to fit him. It is always going to be printable. That is the beautiful thing about it. When Joe was born, I thought some kind of technology would be able to help him, and now, 15 years on, we are there.”
darth5
(source: newsteam – dailymail.co.uk)

You have to love technology. When combined with parents who care about their children, and volunteers willing to donate their time for the well-being of strangers, 3D printing can make a huge impact.
What do you think about this incredible story? Do you like this Darth Vader-esque prosthesis? Discuss in the 3D Printed Darth Vader hand forum thread on 3DPB.com. Check out Chris and Joe’s unboxing video and additional photos below.
darth4
darth3
darth1
darth2
[Source here

Monday 23 February 2015

Inbox by google

Have you ever felt like your inbox was someone else’s to-do list? Requests, project updates and action items stream in all day. You move between your computer and the phone in your pocket to try to manage, and instead of focusing on the most important things, you find yourself focusing on the most recent things. No matter the device, email should feel like a time saver, but instead it feels like a chore.

This is why we created Inbox by Gmail, to help you focus on the things that matter to you. Since we launched five months ago, one of the biggest pieces of feedback we’ve received is that Google Apps customers want access to Inbox at work. That’s why were excited to kick off the next phase of our journey: collaborating with you to bring Inbox to work.

Even before the first invitations went out to use Inbox for your own email, Googlers have been using it to get more done at work. Whether it’s snoozing the expense report notification until after the big presentation, or adding a reminder to schedule lunch with a favorite client, Inbox helps put email on your terms. And since Inbox was built on the same infrastructure as Gmail, it meets the same high security standards you expect from email.
Of course, every company and every person is different, so we want to get more input on how Inbox will work at your company. Starting next month, we’ll begin enabling Inbox for a small group of Google Apps customers to learn about their needs, challenges and use cases.
  • Do you want to use Inbox as your primary email at work?
  • Are employees at your company heavy mobile users?
  • Most importantly, do you want to partner with Google on user studies to help build the new work Inbox?
If you answered “yes, yes and yes!” then email inboxforwork@google.com from your Google Apps for Work administrator account to apply for an invitation to the early adopter program. To start, we plan to work very closely with the early adopter companies, so not everyone that applies will be accepted right away, but the program will continue to expand over the coming months.

Inbox wasn’t created to reinvent email, Inbox was created to help you reinvent the way you get things done. This means we need to understand more about how things get done (or don’t) today. And with your feedback, who knows, we could reinvent the way people work.
Via:google

Wednesday 18 February 2015

Android Home Screen Tour

This Is Tour of my galaxy s4 Home screen.

Voltera-V

Voltera V-One Makes Circuit Boards in Minutes

Designing and Prototyping electronic circuit boards is no easy task and involves many hours of design and development of layouts and populating the board with components. But one small layout mistake can ruin all your work and you have to go through the entire process again. Voltera V-One aims to change this with conductive ink printing system and will make your prototyping an easy task.

Until now there has been no quick and inexpensive way to simple push a button to see if an electronic circuit idea works. The team at Voltera claims that this is what the V-One is all about: a simply operated system that produces prototype circuit boards in fewer steps, at lower-cost, and with all of the ease and convenience of other modern-day rapid prototyping systems.

According to the team, Voltera V-One is the first conductive ink printer that goes further than simply printing single layer circuits on paper like some other printers. The V-One is also claimed capable of printing electrically-separated two layer circuits onto industry standard circuit board substrate, FR4 (Flame Retardant fibre glass epoxy), which, according to its makers, is a first in a machine of this size and price.


In detail, the team says that prototyping is achieved by putting a blank board or template board on the print platform, importing the appropriate design files, and then hitting the print button. It is never quite easy with anything, and the creators add the disclaimer that print time is subject to change with an increase in dimensions or intricacy of the selected design.

Given this, it is claimed that a relatively standard layout such as that of an Arduino board should print in around 15 to 20 minutes. Add to this 30 minutes for the ink to dry, and you have a total time from pushing the print button to finished prototype circuit board of less than an hour.

The 2 layer circuit printing that's one of the claimed points of difference for this printer is a little more complex. It involves swapping out the magnetically-attached print head that supplies the conductive ink., for another head that dispenses a liquid insulating substance. Then, when print is once more selected, the on board software works out where the circuit tracks from each of the layers will overlap, and then applies a mask in those places using the insulating substance. To compete the last layer, the conductive ink head is then reattached and the software finishes applying the tracks of conductive ink.


One other important feature is that V-One's designed to automatically lay down solder paste on the pads to which components are attached and then solidify that paste by baking the board. As for the design software itself, the popularity of Gerber file format prompted V-One design team to provide for the input of these files to the Voltera system. The team hopes to also support other flavors to this software, including CadSoft EAGLE, Altium CircuitMaker, Upverter, and KiCad by the time the V-One hits the market.

Voltera V-One has been launched on Kickstarter, where the team hopes to muster enough support. The creators hope to ship the first early bid run in September 2015, followed by another early bid shipment in January 2016. The team has also added the more useful templates for the common Arduino Uno and Mega development boards, which will be shipped pre-drilled and pre-cut. The team also aims to produce templates for Raspberry Pi, Beagle Bone, Spark Core.

Monday 16 February 2015

5 features of windows phone 10

Interface enhancements, Office upgrades and media options to level the playing field. You’ve been waiting long enough for this, so let’s just jump in. This is the quick guided tour of the 5 cool new features on the Windows 10 Technical preview for phones. Keep in mind folks that this is not a review, since we are dealing with a pre-release technical build and not a finished product. Consider this as a very early advanced look at the few of the new features that will eventually come to Windows 10 for phones.
We will be going in order of coolness or potential coolness according to me, you may disagree with my order so feel free to read other similar hands on previews. For the record am testing this preview releases from a borrowed Lumia 830. You can check here for a list of other supported devices.

1. New voice command input

Windows 10 Technical Preview for Phone_voice command
For literary years Google and Apple have eaten Microsoft’s lunch in voice dictation with a lot of people using it excluding me. This improvement could be huge. Microsoft sticks to its guns and techniques here as you cant manually do punctuation by saying things like period/full-stop, comma, exclamation mark, etc –like you can on other platforms — but at least the parsing seems to be improved. Cortana really doesn’t seem to get punctuation yet, it will just put in periods (full stops) after a long pause but its better than it was on Windows Phone 8.1. And, at least you can pause to think for a second in this version. Also, as I will keep reminding you this is just the technical preview.

2. Action Center changes

Windows 10 Technical Preview for Phone_notifications
Lets be real for a second, not being able to dismiss individual notifications on Windows Phone 8.1 was a pain. And, the limited number of quick toggles on top sometimes felt limiting too. This toggle issue is easily fixed in Windows 10 just by adding an invisible expansion slot and thankfully you can now remove individual alerts just like in Android notifications rather than clearing the whole group.

3. Quick Reply Feature

Windows 10 Technical Preview for Phone_quick reply
Android and iOS already have similar implementations in their latest builds and in Windows 10, Microsoft catches up with the quick reply feature. Once you get a text, just swipe down on the notification to call up the Keyboard and reply. It doesn’t work in emails or third party messenger apps like Facebook at the moment, but its possible those will be added later.

Windows 10 Technical Preview for Phone_settings4. The settings screen

Remember that endless list of identical looking options with nearly a hint of iconography? Thats gone now and holy hell is it easier to find things. Also, there is more granular control over things like brightness. It might have taken you 5 years, but bravo Microsoft.


5. The Key board cursor

Windows 10 Technical Preview for Phone_keyboard cursor
Remember the little eraser like nobs that Dell, IBM and Lenovo laptops used to have that would act like a cursor? Now Windows 10 for phones has one too. This has barely been mentioned in the official talk but its here and its awesome to have and alternative to the tradition tap-directly on the text approach. Which still works on Windows 10 by the way. The execution is just fine on the horizontal movement but it gets a little wonky when you jumping vertically between lines of text. Hopefully this can be attributed to the early preview build.

The other bits and pieces

Windows 10 Technical Preview for Phone_bits and pieces
All these little nuggets deserve further exploration, and in some cases explanation, and you will get them in follow up posts on techjaja.  The preview build is obviously an early one, with plenty of slow animations and dropped frames. Thats no surprise and I expect it to get fixed going forward, but there are also big aesthetic inconsistencies.  That new settings screen has little in common with the older UI elements like the new photo hub menu and has little in common with anything else on the phone.
Different apps appear to be optimized for different phone resolutions and there is a lot of seemingly random enforcement of white elements instead of black. White in the email keyboard, white in the brightness menu, white on the Cortana landing page, its kind of a mess right now.
Also, while I started off with the same transparent tiles I had on Windows Phone 8.1 after the update, I wasn’t able to get them back after I tried out the new Windows 1o look. Since its obviously possible for 10 to support the old transparent tiles, I hope we are at least given the option to retain that look in the future build. And hopefully the cosmetics will get more unified as we go forward.
Lets not forget the other basis like the fact that the Lumia camera is now the default camera on all Windows 10 phones. Other upgrades like the new browser, new maps, and the new Office and Outlook apps are absent from my borrowed 830. With all this stuff pending in the software at such an early stage obviously its not the times for conclusions of any kind. I had to give the Windows Phone fans a quick look for whats in store from Microsoft.

Saturday 14 February 2015

Create GIFs From Videos And Add Text With The New Imgur GIF Creator

We all take our GIFs very seriously but no one takes them as seriously as Imgur. The service started out as a great way to share images on Reddit where the GIF format is very popular. Imgur has been hard at work trying to improve the GIF format. Last year it announced the GIFV format that made it easier to upload and view larger, longer, and better quality GIFs but today it’s done something absolutely wonderful; it’s incorporated a video to GIF maker that even lets you add text to your GIF. If your GIF is large, it will convert it to GIFV format and it will automatically be uploaded to Imgur, ready for sharing.

Copy the link to a video to you clipboard and paste it. Wait for the icon to turn into a green check mark. If it turns into a red cross (like in the screenshot below) the video, for some reason or the other, cannot be used to create a GIF.
Imgur Video_GIF
Assuming the green check mark appears, you will automatically see a video player appear, with volume controls, a play/pause button, and a seek bar. As the video starts playing, use the plus button marker to select the start and end point of the GIF. Add text if you want and once you’re done, click the Create GIF button.


The markers used to mark the start and end of a GIF are really great because they let you manually enter the start and end time of the GIF from the video. The text tool only lets you add text in white but it appears with a shadow ribbon behind it making it easy to read. Unfortunately the size of the text is really small. There is no framerate control and the GIF can be up to fifteen seconds long.
Imgur Video to GIF 2
It takes some time for the GIF to be generated but the end quality has a super high quality glossy finish making it worth the wait. The source video is linked to at the bottom of the Imgur viewer so you don’t have to worry about forgetting the sauce of a GIF.

Visit Video To GIF Maker By Imgur

OxygenOS


oxygenos-logo
After breaking it off with software provider Cyanogen, OnePlus said that it would develop ROMs from now on for its devices, and said that it would reveal more details about OxygenOS on February 12th. Today the details that OnePlus has brought for us aren’t much more than the OxygenOS logo and an introduction of the team that’s developing this new ROMs. No new screenshots, no preview videos and most importantly no release date has been provided by the company.

OnePlus says that one of the reasons it is creating its own ROM is because it would enable better integration between the hardware, software and the cloud will become more seamless for everybody who is using a OnePlus device. The company will also be able to provide users with better localization and push out updates faster.
The company reiterates that OxygenOS will not ship with any bloatware, it is keeping the software “clean and streamlined” for performance. It also says that a stable build is currently being tested and will only be released once OnePlus one can ensure that it is good for public consumption.
OxygenOS is based on Android 5.0.2 and will bring all of the features that are included in Google’s latest iteration of its mobile platform.
The development team that’s working on OxygenOS has many members that have been brought over from the Paranoid Android team, it says that more than 50 people are working on the new software.
Filed in Cellphones. Read more about oneplus, OnePlus One and . Source: oneplus.net
Key SpecsOnePlus One
StatusReleased
Resolution1920x1080
Display Diagonal5.5"
Processor/Soc NameSnapdragon 801
4-core
2.5 GHz
Max. Total Storage Capacity64 GB
Megapixels13 MP
Battery Capacity (mAh)3100 mAh
Street Price$380
Complete product dataOnePlus One Full specs

Friday 13 February 2015

cricket fever watch live world cup on my blog


#wewon'tgiveitback
Watch ICC Worl cup live on my blog

Run windows on mac

According to Forbes, the Best Windows PC is an Apple MacBook Pro, while CNET calls it the best performing Windows Laptop. One does admire the irony of how despite the industry’s best attempts at creating powerful PCs, the title would go to a Mac. There are consumers who admire the hardware of a Mac but are not quite ready to move to Mac’s OS X yet. To address those consumers, Apple has created a multi-boot utility called Boot Camp. Initially released in April 2006, Boot Camp was designed to allow users to install Windows on Intel-Based Mac computers. While Macs aren’t alien to virtualization and can run Windows and even Android as virtual machines, virtualization is nowhere near perfect. With Boot Camp, however, you can run a full, native installation of Windows on your machine, like on a full-blown Windows PC itself. Here’s how.
Install-Windows-on-Mac-using-Boot-Camp

Unlike the tedious process of installing OS X on a PC, and true to the nature of traditional Mac-based apps, using the Boot Camp Assistant is simplicity itself. Boot Camp comes pre-installed with every Mac, so you should already have what you need. Speaking of which, you will need the following before getting started:
  • Genuine Microsoft Windows 7 (or later) installation disc or ISO
  • 8 GB (or greater) USB flash drive
  • 25 GB (minimum) storage space free on your Mac
  • Fully charged battery (if on a Macbook)
Boot Camp currently works with Windows 7 or later releases. We haven’t experimented with Windows XP, as the OS is no longer supported by Microsoft. In case your Windows installation medium is a DVD and your Mac does not have a DVD drive, you can download an image from Microsoft Windows’ official website or anywhere else for that matter, as long as you have a legally purchased serial.
Warning: Do not use a pirated copy of Windows. On top of legal reasons, Boot Camp does not recognize unofficial images.
Plug your USB flash drive into your Mac, and make sure it doesn’t have anything you need because it will be formatted in the process. If you take a look at  Boot Camp Assistant’s icon, you’ll notice that it features a nice little ode to the conundrum that is the windows logo.
Bootcamp-Logo
Launch Boot Camp Assistant, and you will be greeted by a welcome screen, continuing from which gives you 3 options.
Bootcamp-OpeningScreen
Check all three options if you wish to install right away, but if you just want to create a Boot Camp USB for later installation on this or any other Mac, leave the third one unchecked. On the other hand, if you have a previously created Boot Camp USB, just check the last option for installation.
It is important that you let Boot Camp Assistant download the latest Windows support software when creating the bootable USB, since without it, you will have considerable difficulty using your Mac’s hardware on Windows – crucial on a Macbook. In the next step, select your USB drive and the Windows ISO image you want to install from.
Bootcamp-Selection


Clicking Continue will start the process of formatting the USB drive and preparing it for Windows installation. Do not be concerned if the bar looks like it has stopped moving; this step takes times to download and uncompress files. If you didn’t check the ‘Install Windows 7 or later’ option, the process will finish here. If you did check it, it will continue. Next, you will be asked to choose the amount of storage space that you wish to dedicate to Windows.
If you wish to abandon using Mac OS X altogether, then just keep the core OS (handy for trouble shooting when Windows acts up) and lose any extra apps installed, dedicating the remaining space to Windows. Since my interest in Windows is limited to this review, I’m just going to assign it the bare minimum.
Bootcamp-Options
Click ‘Install’, enter your Mac OS X login password if prompted, and Click next. Boot Camp will then create the partition and format it. Once completed, your system will automatically reboot and start installing Windows. This process is identical to how you would Install Windows on a PC.
When asked to select the drive for installing Windows, make sure you select the one labeled “Boot Camp”, and let it format if need be. Enter your Windows serial key when prompted. Your computer will reboot a couple of times and after the standard first time launch process, you’ll be ready to use windows on your Mac.
Boot-Camp-Windows-installation-on-Mac Once installed, go to the
‘BootCamp’ folder on your USB and install it. It will need to reboot and you will have all your drivers, peripherals and utilities installed to bridge the gap between Mac and PC.
BootcampWindowsScreenshot
Whenever you need to reboot to Mac OS X from Windows, click the Boot Camp logo at the bottom right corner and select ‘Boot to Mac OS X’. If you want to uninstall Windows, launch Boot Camp from OS X. Check ‘Remove Windows’, press ‘Restore’ on the next window, and let Boot Camp take care of the rest.
Bootcamp-RemovingWindows
Let us know how your Mac to Windows experience went by leaving a comment below.

Share your screen via lan or internet

I usually prefer services and apps on the web that are free from complex sign up procedures or complicated installation setups. Unfortunately, many screen sharing apps available for Windows suffer from both these annoyances, on top of being fairly expensive. ScreenTask is an open-source screen sharing application that simplifies this task for users who just want to share their screens with others on their local network. As the sharing is done over local WiFi or LAN, it eliminates the need for cumbersome signups. Once the app is up and running, it provides you with a unique URL that can be shared with as many local computers as you want. What’s more, ScreenTask doesn’t require client-side installation. That is, using the URL you shared with them, other users can view your PC’s screen on any web browser and any platform without additional software. Details to be followed.

The application is very easy to set up. The only quirk – if this qualifies as one – is that the app isn’t portable, so if you constantly shift between computers or networks, you can’t simply run it from a flash drive. You’ll have to install it on the system you intend to use for screen sharing. Once you’ve done that, the rest can be configured within a few mouse clicks.
Launch the application and start by selecting the network device you’re currently using from the IP drop down menu. Next, you need to specify the port number, and refresh time in milliseconds.
Optionally, you can also make the screen sharing session private with a username and password. To do that, simply enable ‘Private Task’ and fill the empty ‘User’ and ‘Password’ fields to its right. When you’re done, click the ‘Start Server’ button to begin the screen sharing session.
ScreenTask


Screen Task then generates the appropriate URL for you, which you may share with others on the same network. The link comprises your PC’s IP address and the port number that was set. Recipients just have to enter the URL in the address bar of their web browsers. If the sharing session is private, they will have to enter the associated username and password.
The web-based interface has three options at the bottom that allow recipients to stop watching the session, tweak the refresh time and switch to full-screen mode.
ScreenTask_Browser
Even though there are quite a lot of screen sharing desktop apps, if you ever find the need to share your screen with several users on the same WiFi network or LAN, ScreenTask is definitely worth trying out.
Download ScreenTask

12 things mac can do but pc can't

MultiGesture Trackpad/Magic Mouse

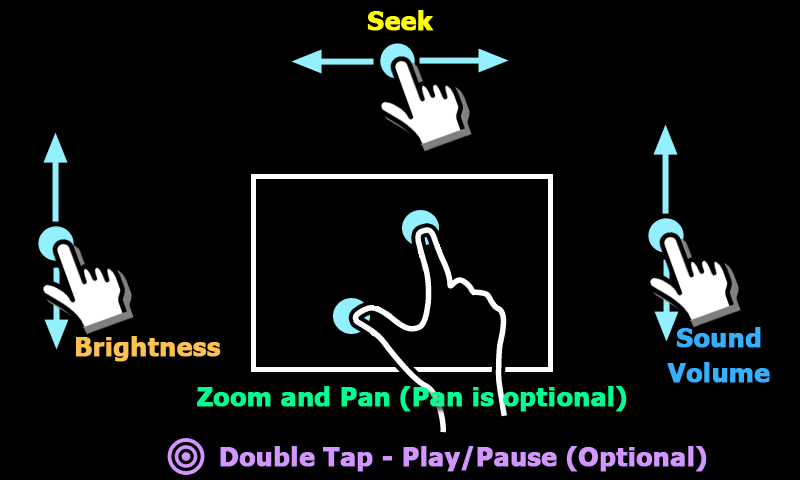
Gestures on a Mac go beyond pinch zooming and rotating. You can configure your Mac, without any external apps, to do about anything with the use of multi touch gestures, like 2 finger scroll to browse tabs, 3 finger drag to select text, 4 finger pinch to run Launchpad, etc. all to be able to better navigate your Mac. It is so intuitive that actually pointing with the mouse feels archaic. Same holds true with the magic mouse, it is like having a trackpad on top of a mouse, also with support for gesture. There are gesture based solutions for PCs but they are nowhere near as smooth.

MacsVSPC - Mouse MacsVSPC - TrackPad

High Resolution Screenshots

With PCs, there are numerous options to collect screenshots, you can save them directly to a file, you can copy them to clipboard to use in with an image editing software, etc. Mac saves you all of that trouble and gives you a list of options on how you want your screenshot captured without relying on other apps to manage quality. The end-result of the screen shot is a very crisp and clear picture, click on the screenshot below and see for yourself.
MacsVSPC - OriginalScreenshot

Retina Display

Retina Display management on a Mac is very intricate, you do not get the feeling of using Retina Display the way everything has been scaled. Even apps that are not retina display ready tend to merge smoothly into this environment (with aliasing in the typeface, but that is expected). With Windows, in higher resolutions, everything is simply scaled up, but this does not affect App behaviour, leading to disproportionate lettering and views. This is not noticeable on a Mac, you have to install Windows on an MBPr to see the actual difference.

Preview PSD Files

In order to view .psd (photoshop document) files on a PC, one needs to install a software package of some sort. However, on a Mac, you simply press spacebar on the .psd file and you will see a preview of the content, no installation necessary.

Extract A 7zip Archive

Again, same as with .psd files, PCs require third party solutions to interact with 7zip files, this constraint does not exist on a Mac, you can simply extract a 7zip file out of the box.

Share Files Directly

If you right click/ctrl + click on certain documents on a Mac, it gives you the option to share it via Facebook, Twitter, LinkedIn or any other services you’ve synced to, including e-mail, flickr and iMessages, saving you the trouble of having to locate content from social media apps.

Record A Screencast

If you launch the default Quicktime player, and open the “File” tab in the menu bar and select “New Screen Recording” you will be able to record a screencast straight from the computer complete with voice-over, no third party solutions needed.


MacsVSPC - ScreenRecording

Keep You Secure

Due to Mac OS X being a UNIX build, there are fewer vulnerabilities, the auto-run launches each package as a separate image and cannot install anything until you personally do it. This, coupled with the earlier fact that Macs share a small percentage of market share, there are not many exploits out there that can harm your Mac. Which leads us to another thing it can do…

Create Encrypted Folders On A Mac

You can actually turn any folder you wish to secure into a password protected .dmg, which only the password bearer can launch. Open Disk Utility – File (menu bar) > New > Blank Disk Image. Assign a size, name and location. Select an encryption type (either are solid), leave the other options as they are, click create and you have yourself a secure folder.
MacsVSPC - Disk Image

Unified Ecosystem

Apple has been working towards a unified ecosystem between all devices, so that, eventually all of Apple’s mobile and computing devices can become an extension of each another. In that light, iOS devices work seamlessly with Macs, you can make Facetime calls to your iOS devices, you can AirDrop files directly to enabled recipients (dragging and dropping files over WiFi) and even receive iMessage directly to your desktop. All of the above is possible on a PC, but it requires a ton of third party solutions to bridge the gaps.

Instantly Create PDFs On A Mac

Open the intended file, or website, press ⌘ + P. change the ‘destination’ from your default printer to “Save as PDF”. This will save your session into one PDF file. If you have saved your work to a PDF file but want to keep your typeface selection, you can just open the pdf in your own Mac and press save, it will embed the fonts in the file, freeing you of design concerns.
MacsVSPC  - Print

Retrieve Old Versions Of A File

Regardless of which tool you used to create a file, if you can view it in the TexEdit app or Preview you can revert to an older version of it: File> Revert to >Browse All Versions and you’ll see cosmic screen in which past versions of your work appear. You can restore your file to a state you once wanted. Simple as that.
MacsVSPC - Old Version
All of the above coupled with unique aspects of Macs that we’ve covered in the past such as AppNapSpotlight Search and powerful Terminal Commands, all without the need of third party apps, shows us just how flexible and powerful Mac OS X is. If we allow third party apps, we can revolutionize the entire OS. What’s even more is that the latest OS X, Mavericks, was completely free. Sure there are downsides to owning a Mac as well, but that is a topic for another day. See anything we missed? Please share your love, hate and respectful disagreements in the comments below.